Welcome to the Dimplex Remote Control Manual, your guide to mastering the features and functions of your Dimplex heater’s remote control. This manual provides essential information for optimal use, ensuring safety, convenience, and efficiency in operating your heating system.
1.1 Purpose of the Manual
This manual is designed to provide users with a comprehensive understanding of the Dimplex remote control’s features, functions, and safe operation. It serves as a guide for proper installation, configuration, and troubleshooting, ensuring optimal performance of your heating system. The manual also outlines essential safety precautions and maintenance tips to prolong the lifespan of your remote control and connected heaters. Refer to this guide for clear instructions and best practices.
1.2 Overview of Dimplex Remote Control Features
The Dimplex remote control offers a range of features designed for convenience and efficiency. It allows users to control multiple heaters, adjust temperature settings, and utilize timer functions. The remote also supports thermostat mode for maintaining a set temperature. Additional features include automatic overheat cutoff and compatibility with various Dimplex heater models. This remote ensures seamless operation, enhancing your heating experience with ease and precision.
Basic Features and Functions of the Dimplex Remote Control
The Dimplex remote control offers essential features for heater operation, including temperature adjustment, flame brightness control, and timer settings. Its user-friendly interface ensures easy navigation and functionality.
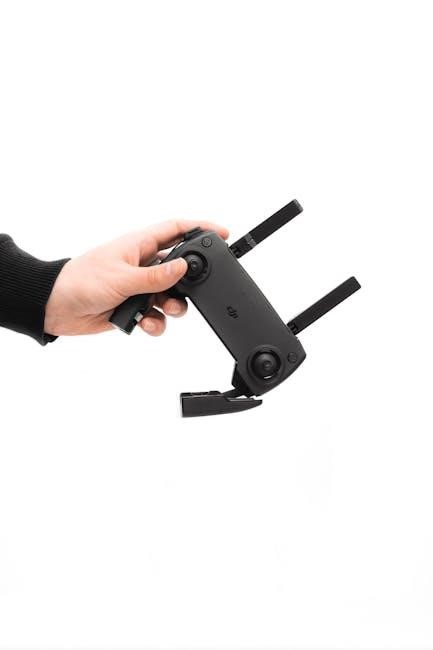
2.1 Controls and Buttons Layout
The Dimplex remote control features a sleek, intuitive design with clearly labeled buttons for power, flame brightness, heat adjustment, and timer settings. The layout includes a navigation pad for menu options, LED indicators for status feedback, and dedicated buttons for specific functions. This ergonomic design ensures easy operation, allowing users to adjust settings effortlessly. The remote’s compact size and logical button placement enhance user experience, making it simple to control your Dimplex heater efficiently.
2.2 Understanding the Remote Control Interface
The Dimplex remote control interface is designed for seamless interaction, featuring a user-friendly layout with power buttons, flame brightness, and heat adjustment controls. The interface includes a navigation pad for menu options and LED indicators for status feedback. It operates via RF signals, ensuring reliable communication with ConnexTM-enabled heaters. The remote’s intuitive design allows easy access to settings like timer functions and multi-heater control, enhancing overall user experience and convenience.
Installation and Setup of the Dimplex Remote Control
Install the remote control by synchronizing it with your Dimplex heater. Follow the initial setup guide for pairing and configuring settings to ensure proper functionality and connectivity.
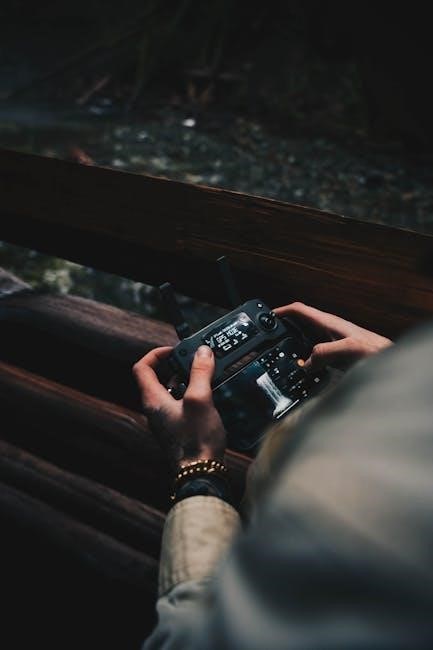
3.1 Synchronizing the Remote Control with Dimplex Heaters
To synchronize the remote control with your Dimplex heater, ensure the heater is in pairing mode. Press and hold the designated button on the remote for 5 seconds until the LED flashes. The remote will send an RF signal to the heater, establishing a connection. Once synchronized, the remote will control the heater’s functions. If issues arise, reset the heater and repeat the process to ensure proper communication.
3.2 Initial Setup and Configuration
Point the remote control towards the heater and press the MENU button until FIRE blinks. Press ENTER twice to access settings. Adjust flame, heat, and timer functions as desired. Ensure the remote is within 30 feet of the heater for optimal signal strength. Note: The default temperature is 72°F (22°C). Refer to the control panel for additional options. Proper setup ensures seamless operation and customization of your heating experience.
Operating Modes of the Dimplex Remote Control
The remote control offers two primary modes: Manual and Thermostat. Manual mode allows direct temperature adjustment, while Thermostat mode maintains a set temperature automatically for consistent comfort.
4.1 Manual Mode Operation
In Manual Mode, the Dimplex remote control allows direct adjustment of heater settings. Press the increase or decrease buttons to set the desired temperature. The LED display shows the current temperature, ensuring real-time feedback. This mode is ideal for precise control, enabling users to customize their comfort levels without relying on automated adjustments. Use Manual Mode for immediate changes, providing flexibility and ease of operation.
4.2 Thermostat Mode Operation
Thermostat Mode allows the Dimplex heater to maintain a consistent temperature. Set your desired temperature using the remote control, and the heater will automatically adjust to achieve and sustain it. This mode is energy-efficient and ideal for long-term comfort. The default temperature is 72°F (22°C), but you can adjust it as needed. The remote ensures precise control, optimizing heating performance while minimizing energy usage.

Safety Features and Precautions
The Dimplex remote control includes an automatic overheat cutoff to prevent overheating. If the heater overheats, it will shut off and require a manual reset by unplugging and waiting 5 minutes before restarting. Always follow safety guidelines to avoid hazards and ensure proper operation.
5.1 Automatic Overheat Cutoff
The Dimplex remote control features an automatic overheat cutoff to ensure safety. If the heater overheats, it will automatically shut off and require a manual reset. To reset, unplug the unit, wait 5 minutes, then plug it back in. If the heater needs frequent resetting, unplug it and contact technical support immediately to avoid potential hazards. This feature ensures safe and reliable operation of your Dimplex heater.
5.2 Resetting the Temperature Cutoff Switch
If your Dimplex heater overheats, it will automatically shut off. To reset, unplug the unit and wait 5 minutes before plugging it back in. Ensure the heater has cooled down completely. If the issue persists, contact technical support at 1-888-346-7539. Avoid continuous resetting, as it may indicate a deeper problem. Always follow safety guidelines to prevent fire hazards and ensure proper functionality of your Dimplex heating system.

Troubleshooting Common Issues
If the remote control isn’t responding, check the batteries and signal strength. Ensure the heater is properly synchronized and plugged in. Consult the manual for detailed solutions or contact technical support for persistent issues.
6.1 Remote Control Not Responding
If the remote control fails to respond, first check the batteries and ensure they are installed correctly. Verify the remote’s signal strength and range, typically up to 5 meters. Ensure the heater is properly synchronized with the remote. If issues persist, unplug the heater, wait 5 minutes, and plug it back in. For unresolved problems, refer to the manual or contact Dimplex technical support for assistance.
6.2 Heater Not Turning On
If the heater fails to turn on, ensure the power supply is stable and the outlet is functioning. Check the manual control switch on the heater, ensuring it’s in the correct position (e.g., Flame & Heat). Verify the remote control is synchronized and functioning properly. If the heater has an overheat cutoff, reset it by unplugging, waiting 5 minutes, and plugging it back in. Consult the manual or contact Dimplex support if issues persist.

Maintenance and Care of the Remote Control
- Replace batteries annually or when low-power indicators appear.
- Clean the remote with a soft cloth, avoiding harsh chemicals.
- Store the remote in a dry, protected area when not in use.
7.1 Battery Replacement and Care
To maintain your Dimplex remote control, replace batteries annually or when low-power indicators appear. Use high-quality, compatible batteries to ensure reliable performance. Avoid mixing old and new batteries. Clean the battery contacts with a soft cloth to prevent corrosion. Store spare batteries in a cool, dry place. Proper disposal of used batteries is essential for environmental safety. Always follow the manufacturer’s guidelines for battery care to ensure optimal remote control functionality.
7.2 Cleaning and Storage Tips
Regularly clean the remote control with a soft, dry cloth to remove dirt and fingerprints. Avoid using harsh chemicals or abrasive materials. Store the remote in a dry, cool place away from direct sunlight. Ensure the remote is not exposed to excessive moisture or vibration. Proper storage and cleaning will maintain its functionality and extend its lifespan. Always handle the remote with care to prevent damage.

Advanced Functions of the Dimplex Remote Control
Explore advanced features like timer functions, scheduling, and multi-heater control, enabling seamless management of your heating system for enhanced convenience and personalized comfort.

8.1 Timer Functions and Scheduling
The Dimplex remote control offers advanced timer functions, allowing you to schedule heating sessions in advance. Set specific on/off times for optimal comfort and energy efficiency. Program daily or weekly schedules to automate your heating needs. This feature ensures your space is warm when you need it, without constant manual adjustments, enhancing convenience and reducing energy waste.
8.2 Multi-Heater Control Features
The Dimplex remote control can manage multiple ConnexTM-enabled heaters, allowing seamless control of several units from a single device. Synchronize the remote with each heater to ensure proper communication. This feature is ideal for controlling heaters in different rooms or large spaces. The remote sends RF signals to connected heaters, enabling simultaneous operation. This multi-heater control enhances convenience and efficiency, making it easier to manage your heating system across your entire home.
Technical Specifications and Compatibility
The Dimplex remote control is compatible with ConnexTM-enabled heaters, operating via RF signals. It has a range of up to 5 meters for reliable communication. Ensure your heater model supports remote functionality for optimal performance.
9.1 Compatible Heater Models
The Dimplex remote control is designed to work seamlessly with various heater models, including ConnexTM-enabled heaters and specific electric fireplace models like IgniteXL, Prism, and Revillusion. It is also compatible with Over Door Heater models such as AC3RE. Ensure your heater is ConnexTM-enabled or listed as compatible in the manual for optimal performance. The remote supports both single and multi-heater setups, providing versatile control over your heating system.
9.2 Remote Control Range and Signal Strength
The Dimplex remote control operates within a maximum range of 5 meters (16.4 feet) for reliable communication with compatible heaters. Signal strength may be affected by physical obstructions or interference from other devices. Ensure a clear line of sight for optimal performance. The remote uses RF signals, which can penetrate walls better than IR, but distance and obstacles can weaken the connection. Point the remote directly at the heater for best results.
The Dimplex remote control manual provides comprehensive guidance for efficient and safe operation. Explore advanced features, troubleshooting, and maintenance tips to maximize your heating experience with ease.
10.1 Summary of Key Features
The Dimplex remote control offers intuitive operation, enabling easy adjustment of temperature, flame settings, and timer functions. It supports multi-heater control, ensuring seamless management of connected units. With a range of up to 30 feet, the remote provides convenient control. Key features include automatic overheat cutoff, a resettable temperature switch, and compatibility with various Dimplex heater models. Designed for user-friendly navigation, it enhances your heating experience with advanced functionality and safety.
10.2 Final Tips for Optimal Use
For the best experience with your Dimplex remote control, ensure it is pointed directly at the heater. Regularly check and replace batteries to maintain functionality. Store the remote in a dry, secure location to prevent damage. Familiarize yourself with the manual for advanced features and troubleshooting. Always follow safety guidelines, such as resetting the overheat switch correctly. Proper maintenance ensures reliable performance and extends the lifespan of your remote control.