
Welcome to this comprehensive guide on 400 Day Clock repair. Discover the art of restoring these intricate timepieces, ensuring precise timekeeping and longevity through proper maintenance techniques.
What is a 400 Day Clock?
A 400 Day Clock, also known as an anniversary clock, is a mechanical timepiece designed to run continuously for approximately 400 days on a single winding. Its unique mainspring and gear system allow for extended operation, making it a popular choice for its convenience and elegance. These clocks often feature a floating balance wheel and are known for their precision and durability. Originating in the late 19th century, they became a symbol of innovation in horology. Their long-running capability and intricate mechanisms make them a favorite among collectors and enthusiasts, though they require careful maintenance to ensure optimal performance.
Importance of Proper Maintenance and Repair
Proper maintenance and repair are crucial for preserving the functionality and longevity of a 400 Day Clock. Regular winding ensures continuous operation, while lubrication prevents mechanical wear. Neglecting these steps can lead to accuracy issues or complete stoppage. Timely repairs address worn parts and maintain precision, safeguarding the clock’s value. A well-maintained clock not only retains its aesthetic appeal but also continues to serve as a reliable timekeeper. Consistent care extends its lifespan, ensuring it remains a cherished timepiece for generations. Professional servicing is recommended to handle complex mechanisms and maintain optimal performance.
Overview of the Repair Process
The repair process for a 400 Day Clock involves a systematic approach to restore functionality and accuracy. It begins with a thorough inspection to identify issues, followed by disassembly to access internal mechanisms. Cleaning and lubrication are essential to remove dirt and ensure smooth operation. Worn or damaged parts are inspected and replaced, with careful attention to the mainspring, escapement, and balance wheel. Reassembly requires precision to maintain proper alignment and tension. Finally, the clock is tested to ensure accurate timekeeping and reliable performance. This methodical process ensures the clock operates efficiently for its full 400-day cycle.

Tools and Materials Needed for Repair
Essential tools include precision screwdrivers, pegwood, and mainspring winders. Materials like lubricants, replacement springs, and gears are crucial for restoring the clock’s functionality and accuracy.
Essential Tools for 400 Day Clock Repair
Precision screwdrivers, both flathead and Phillips, are vital for disassembling components. Pegwood is used to safely remove gears and springs without damage. Mainspring winders are essential for tensioning springs accurately. A jeweler’s loupe or magnifying glass aids in inspecting small parts. Pliers and tweezers are necessary for handling delicate components; A timing dial or beat analyzer helps adjust the escapement mechanism. Lubrication tools, like oilers, ensure proper lubrication of moving parts. A clean, stable workspace with a soft cloth or jeweler’s mat is crucial to prevent damage during repair. These tools are fundamental for a successful 400 Day Clock restoration.
Specialized Materials Required
Key materials include high-quality clock oils and greases for lubrication, ensuring smooth operation. Mainspring replacement kits are essential for restoring energy storage. Dial restoration supplies, like enamel paint or numeric transfers, are needed for refinishing. Bushings and pivot pins may be required to repair worn bearings. Additionally, specialized adhesives and cleaning solutions are necessary for delicate parts. Environmental controls, such as humidity-resistant storage, help maintain accuracy. These materials are crucial for a professional-grade restoration, ensuring the clock’s longevity and performance. Always source parts from reputable suppliers to guarantee compatibility and quality.

Workspace Setup for Optimal Repair Conditions
A clean, dust-free environment is essential for 400 Day Clock repair. Use a stable workbench with a soft, non-abrasive surface to prevent damage. Ensure good lighting, preferably with a magnifying lamp, for detailed work. An anti-static mat can protect sensitive components from static discharge. Organize tools and parts in labeled containers to avoid misplacement. Maintain a consistent room temperature and humidity level to prevent metal expansion or contraction. A well-prepared workspace minimizes risks of damage and ensures efficient repair. Keep a small bin handy for discarded parts and debris. Reference materials, like repair manuals, should be within easy reach.

Understanding the 400 Day Clock Mechanism
The 400 Day Clock mechanism relies on a mainspring powering a gear train, with an escapement and balance wheel ensuring precise timekeeping over an extended period.
The Mainspring and Its Role
The mainspring is the heart of the 400 Day Clock, storing energy to power the mechanism. It unwinds slowly, driving the gears and maintaining consistent power delivery. Proper tension ensures accuracy and longevity. Overwinding or wear can cause inaccuracies or stoppage, requiring careful adjustment or replacement. Regular inspection is crucial to prevent damage and maintain optimal performance. A well-maintained mainspring ensures the clock runs smoothly for its full 400-day cycle, making it a critical component in the clock’s operation and reliability.
The Escapement Mechanism Explained
The escapement mechanism is a critical component in a 400 Day Clock, regulating the release of stored energy from the mainspring. It ensures precise timekeeping by controlling the gear train’s rotation in consistent intervals. The escapement alternately locks and unlocks the wheels, dividing time into equal parts. Its accuracy depends on proper alignment and lubrication. Wear or misalignment can lead to timekeeping errors, making adjustment and maintenance essential. This mechanism is vital for the clock’s reliability and longevity, ensuring it runs smoothly over its extended 400-day cycle.
The Balance Wheel and Its Function
The balance wheel is a crucial oscillator in the 400 Day Clock, regulating the timekeeping by dividing time into precise intervals. It oscillates back and forth, driven by the escapement mechanism, ensuring consistent movement. The balance wheel’s accuracy depends on its hairspring, which provides a restoring force. Proper adjustment of the balance wheel is essential for maintaining precise timekeeping. Over time, wear or dirt can affect its performance, requiring careful cleaning and lubrication. Regular maintenance ensures the balance wheel functions optimally, preserving the clock’s reliability and extending its operational life.

Diagnosing Common Issues
Identify and address common problems in 400 Day Clocks, such as stopping, inaccurate timekeeping, and noise, ensuring proper functionality through systematic diagnosis and repair techniques.
Why Your 400 Day Clock May Stop Running
Your 400 Day Clock may stop running due to a fully unwound mainspring, dirt buildup, or worn parts. Regular maintenance, such as cleaning and lubrication, can prevent these issues. Ensure the clock is wound properly and stored in a stable environment to maintain its accuracy and functionality. Addressing these common causes promptly will help extend the clock’s lifespan and keep it running smoothly for years to come.
Identifying Inaccurate Timekeeping
Inaccurate timekeeping in a 400 Day Clock can stem from issues like an imbalanced escapement, a misaligned balance wheel, or uneven mainspring tension. Environmental factors, such as temperature fluctuations or humidity, may also affect accuracy. Additionally, dirt or wear on critical components can disrupt the clock’s rhythm. Regular inspection and adjustment are essential to maintain precise timekeeping. If the clock gains or loses time consistently, it may indicate a need for professional servicing or part replacement to restore its accuracy and reliability.
Recognizing and Addressing Noise Issues
Noise issues in a 400 Day Clock often indicate mechanical problems within the movement. Common causes include dirt buildup, worn gear teeth, or misaligned components. A grinding or rattling sound may signal improper lubrication or debris in the escapement. To address this, carefully clean the mechanism, ensuring all parts are free from dust and old oil. Apply the correct type and amount of lubricant to moving components. If noises persist, inspect for worn parts, such as the mainspring or balance wheel, and replace them as needed. Professional adjustment may be required to restore smooth operation and eliminate unwanted sounds.

The Repair Process Step-by-Step

Begin with disassembly, carefully documenting each part. Clean and lubricate components, inspect for wear, and replace damaged elements. Reassemble methodically, ensuring alignment and functionality.
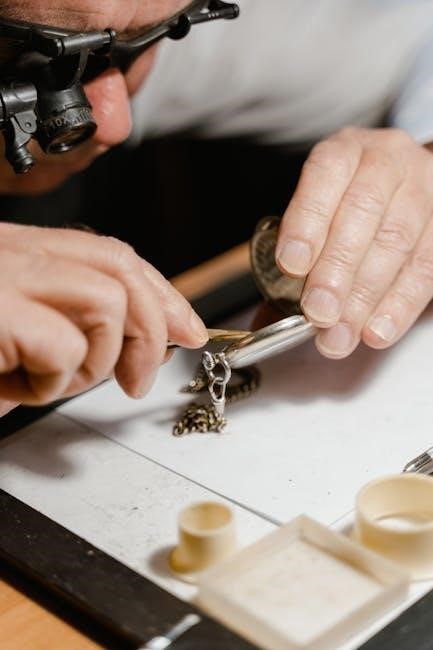
Disassembling the Clock Safely
Begin by removing the clock’s outer casing, ensuring all screws are loosened carefully. Gently lift the movement from the dial, taking note of any springs or levers. Use specialized tools to release tension from the mainspring, preventing sudden unwinding. Detach the hands and dial feet with precision, avoiding force that could damage components. Document each step and store parts in an organized manner to simplify reassembly. Handle gears and pivots with care, as they are delicate. This methodical approach ensures safety and preserves the clock’s integrity for a successful repair process.
Cleaning and Lubricating the Mechanism
Carefully clean the clock’s internal components using a mild solvent to remove dirt and old lubricant. Use a soft-bristle brush to gently scrub gears and pivot points. Dry thoroughly with compressed air or a clean cloth. Apply high-quality clock oil to pivot bearings and gear trains, ensuring minimal application to avoid excess. Lubricate the mainspring barrel and escapement mechanism separately, following manufacturer guidelines. Allow the lubricant to settle before reassembling. Proper cleaning and lubrication are crucial for smooth operation and long-term functionality of the 400 Day Clock.
Inspecting and Replacing Worn Parts
Examine each component for wear, such as gear teeth, pivot pins, and the mainspring. Use a jeweler’s loupe for a detailed inspection. Replace any damaged or corroded parts with authentic replacements. Ensure new components are properly fitted and aligned to maintain precise timekeeping. Lubricate newly installed parts according to the manufacturer’s guidelines. Avoid over-tightening screws or forcing parts into place, as this can cause further damage. If unsure, consult a professional horologist to ensure accuracy and prevent costly mistakes. Proper inspection and replacement are critical for restoring the clock’s functionality and longevity.
Reassembling the Clock
Reassembly requires patience and careful attention to detail. Begin by referring to your disassembly notes and diagrams to ensure correct placement of each part. Start with the gear train, ensuring proper alignment and meshing of teeth. Reattach the escapement and balance wheel, making sure they are securely fastened. Reinstall the mainspring, taking care not to overwind it. Lubricate all moving parts as specified. Finally, reattach the dial and hands, ensuring they are properly aligned. Allow the clock to run for 24 hours before winding to test accuracy. If issues persist, consult a professional horologist for assistance.

Maintenance Tips for Longevity
Regularly clean the clock’s exterior and internal mechanisms. Check for dust accumulation. Ensure proper lubrication levels. Avoid extreme temperatures and humidity. Store in a dry place when not in use.
Regular Winding and Adjustment
Regular winding is essential to maintain the clock’s accuracy and longevity. Wind the mainspring every 400 days or when the clock shows signs of slowing. Over-winding can damage the mechanism. Adjust the timekeeping by turning the balance wheel regulator. Ensure the clock is level during adjustment to avoid uneven movement. Use a key or winding tool specifically designed for 400 Day Clocks. Keep track of winding schedules to prevent stopping. Proper adjustment ensures precise timekeeping and reduces wear on internal components. Regular maintenance helps preserve the clock’s functionality and aesthetic appeal for years to come.
Environmental Factors to Consider
Environmental factors significantly impact the performance and longevity of a 400 Day Clock. Humidity and temperature fluctuations can cause metal components to expand or contract, affecting accuracy. Avoid placing the clock in damp or extreme heat conditions. Dust accumulation can also impair mechanical movement, so keep the clock in a clean, dry environment. Direct sunlight may cause warping or fading of wooden components. Ideal storage conditions include a stable temperature between 15°C and 25°C and relative humidity below 60%. Regular cleaning and proper placement ensure optimal functioning and preserve the clock’s aesthetic and mechanical integrity over time.
Professional Servicing Recommendations
Professional servicing is crucial for maintaining the precision and longevity of a 400 Day Clock. Experts recommend having the clock serviced every 10 to 15 years to ensure optimal performance. A qualified horologist will thoroughly clean the mechanism, inspect for wear, and replace parts as needed. Regular professional care prevents damage from dust, oil degradation, and metal fatigue. Additionally, professionals can fine-tune the clock’s accuracy and address any issues before they escalate. Investing in professional servicing ensures your timepiece remains a reliable and beautiful heirloom for generations. Always choose a reputable specialist with experience in 400 Day Clocks for the best results.

Troubleshooting Common Post-Repair Issues
After repairing your 400 Day Clock, issues like stopping, inaccurate timekeeping, or unusual noises may arise. Check the mainspring tension, as over-winding or under-winding can cause malfunction. Ensure all parts are properly lubricated, as dry mechanisms can lead to friction and wear. Inspect the escapement for proper alignment and cleanliness, as dirt or misalignment can disrupt timekeeping. If the clock stops, verify that the balance wheel is oscillating freely. Addressing these issues promptly ensures reliable operation. Regularly monitoring the clock’s performance post-repair helps maintain its accuracy and longevity, preventing minor problems from escalating into major repairs.